Purpose: Commission any Yarn device (TrailCam, TrapNode, Relay, WeatherStation, TankNode, PLM etc.) onto your Yarn Mesh network and the device and its data will appear in your IMS or Faarm platform.
Audience: Installers, field techs, project leads
Time to commission a device: ~3–5 minutes per unit (once network is in place)
Prerequisites: Active Yarn Mesh network (Gateway online; Relays as planned/designed) • IMS access
1) Prerequisites
- Android or iOS phone with Bluetooth enabled.
- Yarn Commissioner app installed (latest version).
- Device powered on and in Bluetooth advertising window (first ~30 minutes after device power-on/reset).
- You are within 1–5 metres of the device.
- Yarn Mesh coverage present at install location (or within range of a commissioned Yarn Mesh device preferably a Relay).
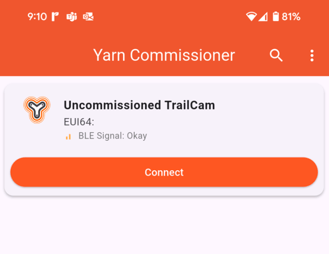
2) Scan & Connect
- Open Yarn Commissioner app.
- Tap the Bluetooth button (orange button, bottom-right) to start scanning.

- Find your device:
- Shows device type icon and status (e.g., Uncommissioned TrailCam).
- Displays BLE Signal: Good/Okay/Poor.
- Tap Connect.
Tip: If status shows Fetching…, allow a few seconds for first discovery. Move closer if BLE is Poor.
3) Verify Health (Automatic Tests)
Once connected, you’ll see three tiles:
- Mesh Health – neighbour count and link status.
- Battery Health – voltage/capacity check.
- Sensor Health – device-specific checks (e.g., camera, PIR, IO, memory).
Test Status Colours:
- Green = Pass
- Amber/Orange = In progress/Watch
- Red = Action required
Tap a tile to view details. Resolve any red-status issues before commissioning.


Uncommissioned TrailCam (left) vs uncommissioned TrapNode (right) (app in Dark Mode)
4) Commission Device
- Tap Commission (bottom-right green button).
- Enter a Device Name (this becomes the Asset Name in IMS).
- Use your project naming convention (e.g., 26T_CUST_PRJ_008).
- Tap Commission to confirm.
You’ll see a success message and the device will enter your IMS or Faarm system. The card title will change to the device name on next scan.


5) (Optional) Open Terminal
- Tap Open Terminal to access the live command console.
- Use for advanced diagnostics, e.g.:
- sensor get board_voltage
Note: Terminal is intended for trained users or with FTP Support guidance.
6) Final Checks
- Confirm the Camera Image taken is good.
- Confirm Device Specific Health (e.g. TrapNode) is green.
- Confirm Mesh Health shows ≥1 neighbour.
- Confirm Battery Health is green.
- Confirm Solar Health is green.
- Confirm Sensor Health is green.
- For TrailCam: confirm a test image reaches IMS (if network path is live).
- Physically secure and position device appropriately.
Troubleshooting (Quick Guide)
- No devices found: Ensure Bluetooth is ON; power-cycle the device; move closer and rescan.
- Cannot connect: Another phone might be connected; wait 1–2 minutes, then retry.
- Commission button greyed out: Wait for health checks to finish or fix any red-status issues.
- Weak mesh: Reposition near a Relay or add a Relay to extend coverage.
Support: support@yarnmesh.ai | Include device type, name, location, and screenshots.